
Intro Link to heading
I am a 40+ software engineer and recreational Jiu Jitsu practitioner, struggling with vast amount of information related to the sport. I decided to make use of my `computer` skills to aid me in the process of taming this new skill.
This post is going to demonstrate how to use ffmpeg in order to:
- Split long insturctions into logical chapters
- Capture screenshots
- Create animated gifs demonstrating techniques
This post will cover the fundamentals and will be the base for future posts that will demonstrate integrations with ohter tools.
What is ffmpeg ? Link to heading
ffmpeg is tools for recording, manipulating and streaming videos. It’s free & opensource and available for most operationg systems. In this post we are going to focus on the `manipulating` part.
Why we need ffmpeg ? Link to heading
Jiu Jitsu instructionals are long. Even though they are usually split into pieces, each piece easily exceeds one hour in duration and looks more like a seminar rather than a lesson. Personally, I find that in most cases it’s really hard to digest more than 10-15 minutes in a single sitting. So, I’d like to split the videos even further, maybe per scene.
Also, I would like to embed parts of the instructional directly inside my notes. For example, in the section where I have my notes on `Juji Gatame` I’d like to have an animated gif demonstrating the technique. In more rare cases, a single screenshot form the video would sufice (e.g. to demonstrate hand placement in various techniques).
Installing ffmpeg Link to heading
This section describes how to install it based on your operating system.
Linux Link to heading
If you are using linux chances are that you don’t really need me to tell you how to install it.
Fedora Link to heading
| |
Ubuntu Link to heading
| |
OSX Link to heading
| |
Windows Link to heading
Windows users will have to install and get familiar with wsl, first. Then:
| |
From now on all command we provide will need to go via wsl unless explicitly specified.
Detecting chapters Link to heading
To make long instructionals more usable:
- easier to search
- split in digestable chunks
we will have to split them.
Luckily, most of them contain multiple scenes each starting with a title screen, like the ones shown below:
This makes it possible to use ffmpeg in order to detect scenes. The idea is to detect frames that have noticable differences than the previous one.
This can be done using a command like:
| |
The command above does the following:
- collect frames that have 80% difference in pixels from the previous one (you can play around with this value
- grab the value of the 7th column of the output that contains the timestamp
- keep only the numeric value
The result will be the timestamps in seconds of each different scene.
There are many things you can do with this timestamp. Below are some examples:
Spliting the video by chapter Link to heading
The script below will attempt to detect chapters and split the long video accordingly.
| |
If the script isn’t accurate enough, you may need to tinker the pixel percentage.
Creating animated gifs Link to heading
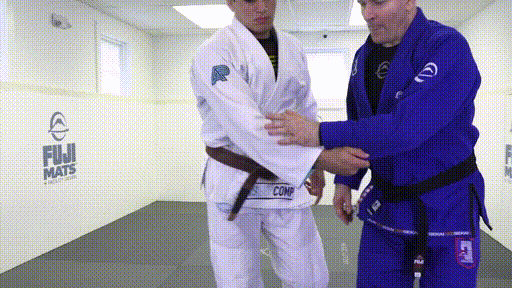
Even if splitting a large video into smaller chunks, those chunks won’t be small enough. Sometimes, you just need to get a glimpse of a technique in order to remember what it is about. It often helps using and embedding animated images direcly inside your notes (assuming they are in a digital format).
Here’s an example an animated image that is demonstrating the `pumping method` for breaking grips:
| |
The script can then be invoked like:
| |
The challenge here is to spot and keep track of the beginning and end times. In future posts I am going to provide tips on how to simplify that as much as possible.
Extracting a single frame as an image. Link to heading
Sometimes you just want to extract a single image instead of an animated gif. This can be especially useful if you intend to print your notes on paper.
| |
Post index Link to heading
- Hackers guide to Jiu Jitsu: intro wordpress version github version
- Hackers guide to Jiu Jitsu: ffmpeg wordpress version github version
- Hackers guide to Jiu Jitsu: mplayer wordpress version github version
- Hackers guide to Jiu Jitsu: markdown wiki wordpress version github version
- Hackers guide to Jiu Jitsu: flowcharts wordpress version github version